设计模式 golang 实现
10 Jun 2021仅为学习设计模式的记录
创建型模式
抽象工厂
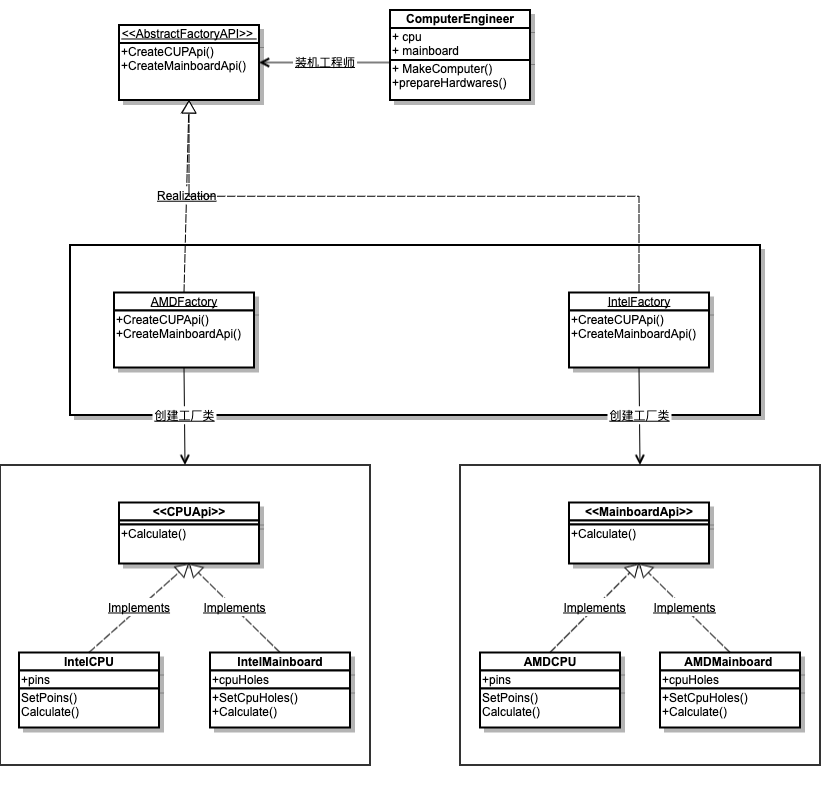
抽象工厂模式 Abstract factory,提供一个创建一系列相关或相互依赖对象的接口,而无需指定它们具体的类。
- 抽象工厂提供一个独立的类来创建多个可以共存的对象
- 抽象工厂模式其实就是策略模式对于同一问题的应用
UML Diagram
实现
为 CPU 创建一个接口,然后创建实现接口的实体类。
package abstractfactory

import "fmt"

// cpu 的接口
type CPUApi interface {
	Calculate() string // CPU 具有运算的功能
}

// IntelCPU

type IntelCPU struct {
	pins int // CPU 的针脚数目
}

// SetPoins 设置针脚数目
func (i *IntelCPU) SetPoins(p int) {
	i.pins = p
}

// Calculate 运算
// @return 返回计算结果
func (i *IntelCPU) Calculate() string {
	return fmt.Sprintf("now in Intel CPU,pins=%v", i.pins)
}

// AMDCPU

type AMDCPU struct {
	pins int // CPU 的针脚数目
}

// SetPoins 设置针脚数目
func (i *AMDCPU) SetPoins(p int) {
	i.pins = p
}

// Calculate 运算
// @return 返回计算结果
func (i *AMDCPU) Calculate() string {
	return fmt.Sprintf("now in AMD CPU,pins=%v", i.pins)
}
为主板创建一个接口,然后创建实现接口的实体类。
package abstractfactory

import "fmt"

// 主板的接口
type MainboardApi interface {
	InstallCPU() string // 主板具有安装 CPU 的功能
}

// IntelMainboard 主板
type IntelMainboard struct {
	cpuHoles int // CPU 插槽的孔数
}

// SetCpuHoles 设置 CPU 插槽的孔数
func (i *IntelMainboard) SetCpuHoles(p int) {
	i.cpuHoles = p
}

// InstallCPU 安装 CPU
// @return 返回安装结果
func (i *IntelMainboard) InstallCPU() string {
	return fmt.Sprintf("now in IntelMainboard,cpuHoles=%v", i.cpuHoles)
}

//  AMDMainboard AMD 主板
type AMDMainboard struct {
	cpuHoles int // CPU 插槽的孔数
}

// SetCpuHoles 设置 CPU 插槽的孔数
func (i *AMDMainboard) SetCpuHoles(p int) {
	i.cpuHoles = p
}

// InstallCPU 安装 CPU
// @return 返回安装结果
func (i *AMDMainboard) InstallCPU() string {
	return fmt.Sprintf("now in AMDMainboard,cpuHoles=%v", i.cpuHoles)
}
定义抽象工厂接口,AMDFactory,IntelFactory 两种不同的装机工厂
package abstractfactory

type AbstractFactoryAPI interface {
	CreateCUPApi() CPUApi             // 创建 cup 对象, @return cpu 对象
	CreateMainboardApi() MainboardApi // 创建 Mainboard 对象, @return Mainboard 对象
}

// AMD 装机工厂,Intel 的 CPU + 主板
// 这里创建 CPU 和主板对象的时候,是对应的,能匹配上的
type AMDFactory struct{}

func NewAMDFactory() *AMDFactory {
	return &AMDFactory{}
}

func (*AMDFactory) CreateCUPApi() CPUApi {
	return &AMDCPU{1156}
}

func (*AMDFactory) CreateMainboardApi() MainboardApi {
	return &AMDMainboard{1156}
}

// Intel 装机工厂,AMD 的 CPU + 主板
// 这里创建 CPU 和主板对象的时候,是对应的,能匹配上的
type IntelFactory struct{}

func NewIntelFactory() *IntelFactory {
	return &IntelFactory{}
}

func (IntelFactory) CreateCUPApi() CPUApi {
	return &IntelCPU{939}
}

func (IntelFactory) CreateMainboardApi() MainboardApi {
	return &IntelMainboard{939}
}
定义使用抽象工厂的客户端,即装机工程师类
package abstractfactory

import (
	"fmt"
)

// ComputerEngineer 工程师类

type ComputerEngineer struct {
	cpu       CPUApi
	mainboard MainboardApi
}

func NewComputerEngineer() *ComputerEngineer {
	return &ComputerEngineer{}
}

// 装机过程
// @param f 客户选择的装机方案
func (c *ComputerEngineer) MakeComputer(f AbstractFactoryAPI) string {
	return c.prepareHardwares(f)
}

// 准备装机所需要的配件
// @param f 客户选择的装机方案
func (c *ComputerEngineer) prepareHardwares(f AbstractFactoryAPI) string {
	c.cpu = f.CreateCUPApi()
	c.mainboard = f.CreateMainboardApi()
	return fmt.Sprintf("%s;%s", c.cpu.Calculate(), c.mainboard.InstallCPU())
}
测试代码
package abstractfactory

import (
	"testing"
)

// 测试抽象工厂
func TestAbstractfactory(t *testing.T) {

	// 装机工程师
	computerEngineer := NewComputerEngineer()
	f1 := NewAMDFactory()
	f2 := NewIntelFactory()

	s := computerEngineer.MakeComputer(f1)
	if s != "now in AMD CPU,pins=1156;now in AMDMainboard,cpuHoles=1156" {
		t.Fatal("TestAbstractfactory test fail")
	}

	s = computerEngineer.MakeComputer(f2)
	if s != "now in Intel CPU,pins=939;now in IntelMainboard,cpuHoles=939" {
		t.Fatal("TestAbstractfactory test fail")
	}
}
简单工厂
基本概念
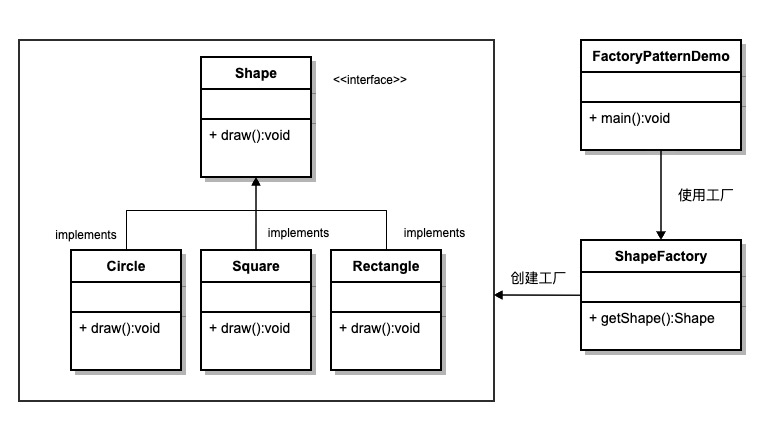
将对象创建的逻辑封装起来,为使用者提供一个简单易用的对象创建接口
目的:定义一个创建对象的接口,通过使用一个共同的接口来指向新创建的对象 应用场景:
- 在创建对象的时候都需要考虑工场模式,以便于适应未来的变化
限制和约束因素:
尽量遵循单一职责,一个类只提供一种功能。
UML Diagram
案例
考虑有不同的 Shape 对象,分别是 Rectangle, Square, Circle
package simpleFactory

type Shape interface {
	draw() string
}

type Rectangle struct{}

func (*Rectangle) draw() string {
	return "Inside Rectangle::draw() method."
}

type Square struct{}

func (*Square) draw() string {
	return "Inside Square::draw() method."
}

type Circle struct{}

func (*Circle) draw() string {
	return "Inside Circle::draw() method."
}
为 Share 提供一个工厂对象:
package simpleFactory

type Factory struct{}

func (f *Factory) Create(shape_type string) Shape {
	if shape_type == "CIRCLE" {
		return &Circle{}
	} else if shape_type == "RECTANGLE" {
		return &Rectangle{}
	} else if shape_type == "SQUARE" {
		return &Square{}
	}
	return nil
}
测试代码如下:
package simpleFactory

import "testing"

func TestGetShape(t *testing.T) {
	f := &Factory{}
	s := f.Create("CIRCLE")
	if s.draw() != "Inside Circle::draw() method." {
		t.Fatal("Circle::draw() test fail")
	}

	s = f.Create("RECTANGLE")
	if s.draw() != "Inside Rectangle::draw() method." {
		t.Fatal("Rectangle::draw() test fail")
	}

	s = f.Create("SQUARE")
	if s.draw() != "Inside Square::draw() method." {
		t.Fatal("Square::draw() test fail")
	}
}
单例模式
目的:保证一个实例 应用场景:
- 应用程序的日志存储
- web 应用的配置读取
- 创建的一个对象需要消耗的资源过多,比如 I/O 与数据库的连接池等。
限制和约束因素:
实现
golang 闭包版单例模式:
func GetLoggerSingle() func() *zap.Logger {
	var logger *zap.Logger
	return func() *zap.Logger {
		if logger == nil {
			logger = zap.NewExample()
		}
		return logger
	}
}

var GetLogger = GetLoggerSingle()
golang 线程安全单例模式:
var once sync.Once
var logger *zap.Logger

func GetLogger() *zap.Logger {
	once.Do(func() {
		logger = zap.NewExample()
	})
	return logger
}
建造者模式
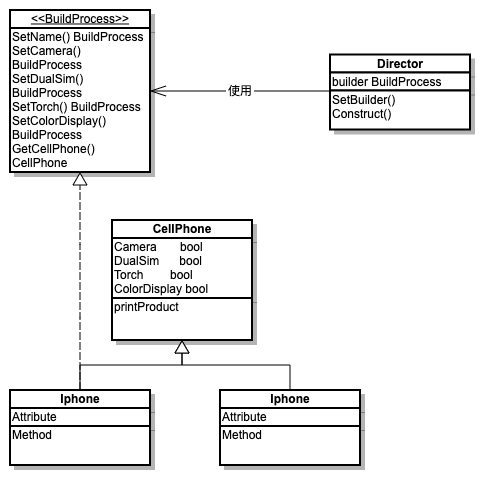
建造者模式(Builder),将一个复杂对象的构建与它的表示分离,使得同样的构建过程可以创建不同的表示。
UML Diagram
实现
Product:定义产品的结构。 (在我们的例子中是 CellPhone)。
BuildProcess:它是定义构建产品所要采取的步骤的接口。 它没有定义任何逻辑,只是定义了流程的蓝图。 它是代码的一部分,而不是如何去做。
具体实现:这是如何做部分代码。 所有产品都实施构建过程以满足他们的需求。 考虑到所讨论的手机示例,Iphone 将具有与 Xiaomi 不同的具体实现。
Director:Director 是使用构建器界面构建产品的客户。 它的职责是执行构建过程中定义的步骤。
package builder

import (
	"fmt"
)

type CellPhone struct {
	Name         string
	Camera       bool
	DualSim      bool
	Torch        bool
	ColorDisplay bool
}

func (c *CellPhone) printProduct() {
	fmt.Printf("%s has camera? %v\n", c.Name, c.Camera)
	fmt.Printf("%s has Dual Sim? %v\n", c.Name, c.DualSim)
	fmt.Printf("%s has Torch? %v\n", c.Name, c.Torch)
	fmt.Printf("%s has Color Display? %v\n", c.Name, c.ColorDisplay)
}

// 构建过程
type BuildProcess interface {
	SetName() BuildProcess
	SetCamera() BuildProcess
	SetDualSim() BuildProcess
	SetTorch() BuildProcess
	SetColorDisplay() BuildProcess
	GetCellPhone() CellPhone
}

type Iphone struct {
	Phone CellPhone
}

func (n *Iphone) SetName() BuildProcess {
	n.Phone.Name = "Iphone"
	return n
}

func (n *Iphone) SetCamera() BuildProcess {
	n.Phone.Camera = false
	return n
}

func (n *Iphone) SetDualSim() BuildProcess {
	n.Phone.DualSim = false
	return n
}

func (n *Iphone) SetTorch() BuildProcess {
	n.Phone.Torch = true
	return n
}

func (n *Iphone) SetColorDisplay() BuildProcess {
	n.Phone.ColorDisplay = false
	return n
}

func (n *Iphone) GetCellPhone() CellPhone {
	return n.Phone
}

type Xiaomi struct {
	Phone CellPhone
}

func (n *Xiaomi) SetName() BuildProcess {
	n.Phone.Name = "Xiaomi"
	return n
}

func (s *Xiaomi) SetCamera() BuildProcess {
	s.Phone.Camera = true
	return s
}

func (s *Xiaomi) SetDualSim() BuildProcess {
	s.Phone.DualSim = true
	return s
}

func (s *Xiaomi) SetTorch() BuildProcess {
	s.Phone.Torch = false
	return s
}

func (s *Xiaomi) SetColorDisplay() BuildProcess {
	s.Phone.ColorDisplay = true
	return s
}

func (s *Xiaomi) GetCellPhone() CellPhone {
	return s.Phone
}

type Director struct {
	builder BuildProcess
}

func (d *Director) SetBuilder(b BuildProcess) {
	d.builder = b
}

func (d *Director) Construct() CellPhone {
	d.builder.SetName().SetCamera().SetDualSim().SetTorch().SetColorDisplay()
	return d.builder.GetCellPhone()
}
测试代码:
package builder

import (
	"fmt"
	"testing"
)

//TestAdapter
func TestAdapter(t *testing.T) {
	diro := Director{}
	iphone := &Iphone{}
	diro.SetBuilder(iphone)
	phone := diro.Construct()
	phone.printProduct()
	fmt.Println("--------")
	xiaomi := &Xiaomi{}
	diro.SetBuilder(xiaomi)
	phone = diro.Construct()
	phone.printProduct()
}
结构型模式
适配器模式
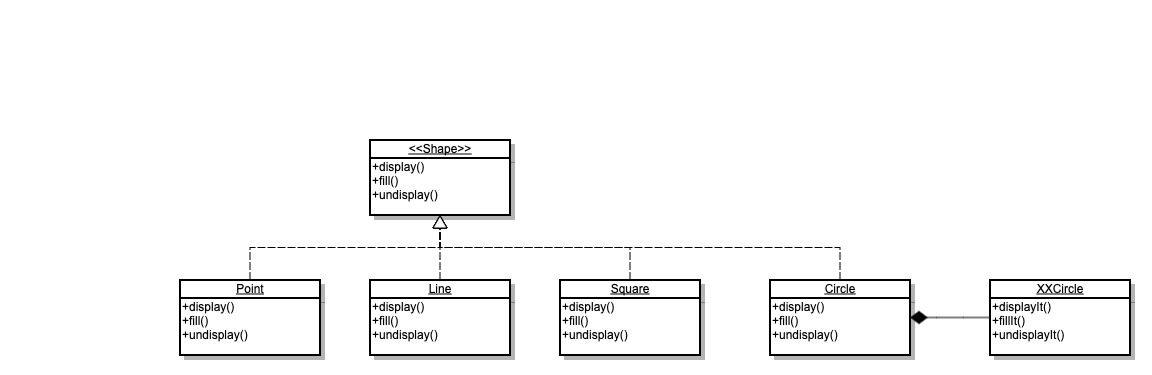
将一个类的接口转换成客户希望的另外一个接口。Adapter 模式使得原本由于接口不兼容而不能一起工作的那些类可以一起工作
- 适配器属于结构型模式
Adapter模式提供了具有所需接口的包装类
UML Diagram
实现
考虑有不同的 Shape 对象,分别是 Point, Line, Square
package adapter

import "fmt"

type Shape interface {
	display()
	fill()
	undisplay()
}

type Point struct{}

func (s *Point) display() {
	fmt.Println("Inside Point::display() method.")
}

func (s *Point) fill() {
	fmt.Println("Inside Point::display() method.")
}

func (s *Point) undisplay() {
	fmt.Println("Inside Point::undisplay() method.")
}

type Line struct{}

func (s *Line) display() {
	fmt.Println("Inside Line::display() method.")
}

func (s *Line) fill() {
	fmt.Println("Inside Line::display() method.")
}

func (s *Line) undisplay() {
	fmt.Println("Inside Line::undisplay() method.")
}

type Square struct{}

func (s *Square) display() {
	fmt.Println("Inside Line::display() method.")
}

func (s *Square) fill() {
	fmt.Println("Inside Line::display() method.")
}

func (s *Square) undisplay() {
	fmt.Println("Inside Line::undisplay() method.")
}

type XXCircle struct{}

func (s *XXCircle) displayIt() {
	fmt.Println("Inside XXCircle::display() method.")
}

func (s *XXCircle) fillIt() {
	fmt.Println("Inside XXCircle::display() method.")
}

func (s *XXCircle) undisplayIt() {
	fmt.Println("Inside XXCircle::undisplay() method.")
}
现在我们需要实现一个圆(一种新的 Shape),但是发现已经被别人写好了,糟糕的是它的命名方法和 Shape 定义的不一致
type XXCircle struct{}

func (s *XXCircle) displayIt() {
	fmt.Println("Inside XXCircle::display() method.")
}

func (s *XXCircle) fillIt() {
	fmt.Println("Inside XXCircle::display() method.")
}

func (s *XXCircle) undisplayIt() {
	fmt.Println("Inside XXCircle::undisplay() method.")
}
我们无法改变它,只能去想办法适配它
package adapter

type Circle struct {
	circle *XXCircle
}

func NewCircle() *Circle {
	return &Circle{&XXCircle{}}
}

func (s *Circle) display() {
	s.circle.displayIt()
}

func (s *Circle) fill() {
	s.circle.fillIt()
}

func (s *Circle) undisplay() {
	s.circle.undisplayIt()
}
测试代码
package adapter

import "testing"

//TestAdapter
func TestAdapter(t *testing.T) {
	circle := NewCircle()
	circle.display()
	circle.fill()
	circle.undisplay()
}
外观模式
外观模式(Facade Pattern)隐藏系统的复杂性,并向客户端提供了一个客户端可以访问系统的接口。这种类型的设计模式属于结构型模式,它向现有的系统添加一个接口,来隐藏系统的复杂性。
facade模式为子系统中的一组接口定义一组(一个或多个)高层接口,使得子系统更加容易使用。- 降低访问复杂系统的内部子系统时的复杂度,简化客户端之间的接口。
UML Diagram
实现
考虑有不同的 Shape 对象,分别是 Rectangle, Square, Circle
package facade

type Shape interface {
	draw() string
}

type Rectangle struct{}

func (*Rectangle) draw() string {
	return "Rectangle::draw()"
}

type Square struct{}

func (*Square) draw() string {
	return "Square::draw()"
}

type Circle struct{}

func (*Circle) draw() string {
	return "Circle::draw()"
}
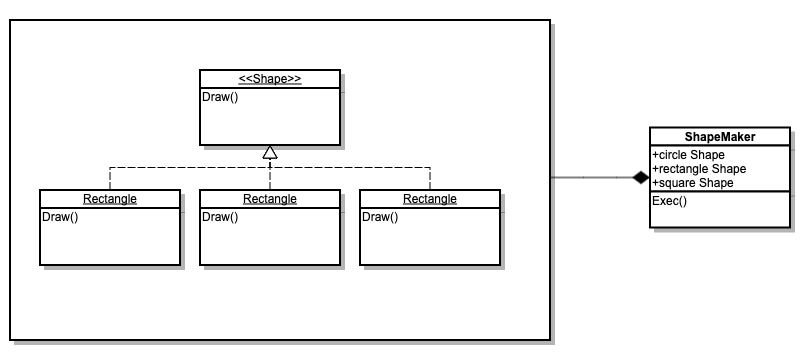
定义一个外观类 ShapeMaker,隔离内部复杂的子系统,简化与客户端的接口
package facade

type ShapeMaker struct {
	circle    Shape
	rectangle Shape
	square    Shape
}

func NewShapeMaker() *ShapeMaker {
	s := &ShapeMaker{}
	s.circle = &Circle{}
	s.rectangle = &Rectangle{}
	s.square = &Square{}
	return s
}

func (s *ShapeMaker) exec() string {
	result := ""
	result += s.circle.draw()
	result += s.rectangle.draw()
	result += s.square.draw()
	return result
}
测试代码:
package facade

import (
	"testing"
)

func TestNewShapeMaker(t *testing.T) {
	s := NewShapeMaker()
	ret := s.exec()
	if ret != "Circle::draw()Rectangle::draw()Square::draw()" {
		t.Fatal("NewShapeMaker test fail")
	}
}
代理模式
在代理模式(Proxy Pattern)中,一个类代表另一个类的功能。这种类型的设计模式属于结构型模式。 在代理模式中,我们创建具有现有对象的对象,以便向外界提供功能接口。
UML Diagram
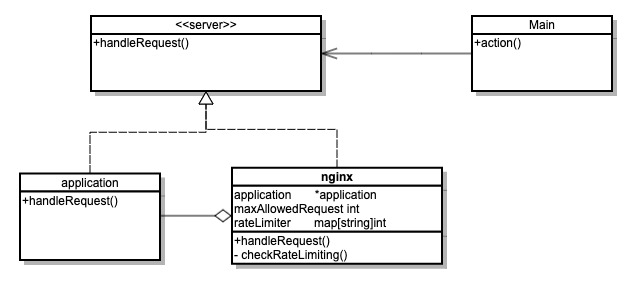
实现
package main

import "fmt"

type server interface {
	handleRequest(string, string) (int, string)
}

type nginx struct {
	application       *application
	maxAllowedRequest int
	rateLimiter       map[string]int
}

func newNginxServer() *nginx {
	return &nginx{
		application:       &application{},
		maxAllowedRequest: 2,
		rateLimiter:       make(map[string]int),
	}
}

func (n *nginx) handleRequest(url, method string) (int, string) {
	allowed := n.checkRateLimiting(url)
	if !allowed {
		return 403, "Not Allowed"
	}
	return n.application.handleRequest(url, method)
}

func (n *nginx) checkRateLimiting(url string) bool {
	if n.rateLimiter[url] == 0 {
		n.rateLimiter[url] = 1
	}
	if n.rateLimiter[url] > n.maxAllowedRequest {
		return false
	}
	n.rateLimiter[url] += 1
	return true
}

type application struct {
}

func (n *application) handleRequest(url, method string) (int, string) {
	if url == "/app/status" && method == "GET" {
		return 200, "Ok"
	}
	if url == "/create/user" && method == "POST" {
		return 201, "User Created"
	}
	return 404, "Not Ok"
}

func main() {
	nginxServer := newNginxServer()
	appStatusURL := "/app/status"
	createuserURL := "/create/user"
	httpCode, body := nginxServer.handleRequest(appStatusURL, "GET")
	fmt.Printf("\nUrl: %s\nHttpCode: %d\nBody: %s\n", appStatusURL, httpCode, body)
	httpCode, body = nginxServer.handleRequest(appStatusURL, "GET")
	fmt.Printf("\nUrl: %s\nHttpCode: %d\nBody: %s\n", appStatusURL, httpCode, body)
	httpCode, body = nginxServer.handleRequest(appStatusURL, "GET")
	fmt.Printf("\nUrl: %s\nHttpCode: %d\nBody: %s\n", appStatusURL, httpCode, body)
	httpCode, body = nginxServer.handleRequest(createuserURL, "POST")
	fmt.Printf("\nUrl: %s\nHttpCode: %d\nBody: %s\n", appStatusURL, httpCode, body)
	httpCode, body = nginxServer.handleRequest(createuserURL, "GET")
	fmt.Printf("\nUrl: %s\nHttpCode: %d\nBody: %s\n", appStatusURL, httpCode, body)
}
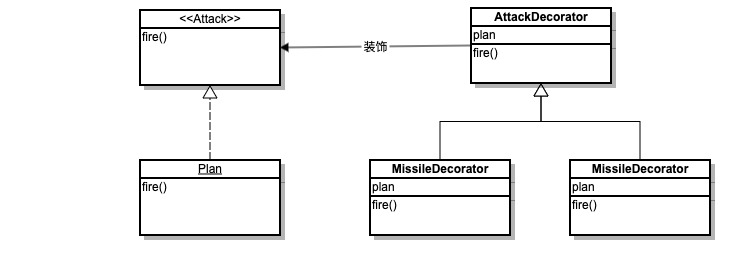
装饰器模式
装饰器模式(Decorator Pattern)允许向一个现有的对象动态的添加新的功能,同时又不改变其结构。这种类型的设计模式属于结构型模式,它是作为现有的类的一个包装。
- Decorator 模式使用组合而非继承的方式,能够动态地为本体对象叠加新的行为
- 装饰类和代理非常相似,装饰是为了扩展对象的功能,而代理是为了控制对原来对象的访问
UML Diagram
实现
假设我们在写一个飞机战斗游戏,随着经验值增加,我们需要给飞机升级为更厉害的飞机,一开始发射普通子弹,第二级发射极光武器,第三季可以发射导弹
代码中省略了 AttackDecorator 抽象类
package decoratorpackage decorator

import "fmt"

type Attack interface {
	fire()
}

type Plan struct {
	Attack
}

func (p *Plan) fire() {
	fmt.Println("发射普通子弹")
}

// 导弹
type MissileDecorator struct {
	Attack
	plan *Plan
}

func (p *MissileDecorator) fire() {
	p.plan.fire()
	fmt.Println("发射导弹")
}

// 激光
type LaserDecorator struct {
	Attack
	plan *Plan
}

func (p *LaserDecorator) fire() {
	p.plan.fire()
	fmt.Println("发射起光")
}
测试代码
package decorator

import (
	"fmt"
	"testing"
)

func TestDecorator(t *testing.T) {
	plan := &Plan{}
	fmt.Println("Plan fire:")
	plan.fire()

	missile := &MissileDecorator{
		plan: plan,
	}

	fmt.Println("MissileDecorator fire:")
	missile.fire()

	laser := &LaserDecorator{
		plan: plan,
	}

	fmt.Println("LaserDecorator fire:")
	laser.fire()
}
组合模式
Composition 模式将对象组合成树形结构以表示“部分-整体”的层次结构,使得用户对单个对象和组合对象的使用具有一致性。
- 经典的面向对象设计原则是:组合优于继承。
应用场景:图形界面、树形菜单、文件夹和文件管理
UML

实现
package component

import "fmt"

type component interface {
	search(string)
}

type folder struct {
	components []component
	name       string
}

func (f *folder) search(keyword string) {
	fmt.Printf("Serching recursively for keyword %s in folder %s\n", keyword, f.name)
	for _, composite := range f.components {
		composite.search(keyword)
	}
}

func (f *folder) add(c component) {
	f.components = append(f.components, c)
}

type file struct {
	name string
}

func (f *file) search(keyword string) {
	fmt.Printf("Searching for keyword %s in file %s\n", keyword, f.name)
}

func (f *file) getName() string {
	return f.name
}
测试代码:
package component

import (
	"testing"
)

func TestComponent(t *testing.T) {
	file1 := &file{name: "File1"}
	file2 := &file{name: "File2"}
	file3 := &file{name: "File3"}
	folder1 := &folder{
		name: "Folder1",
	}
	folder1.add(file1)

	folder2 := &folder{
		name: "Folder2",
	}
	folder2.add(file2)
	folder2.add(file3)
	folder2.add(folder1)
	folder2.search("rose")
}
行为型模式
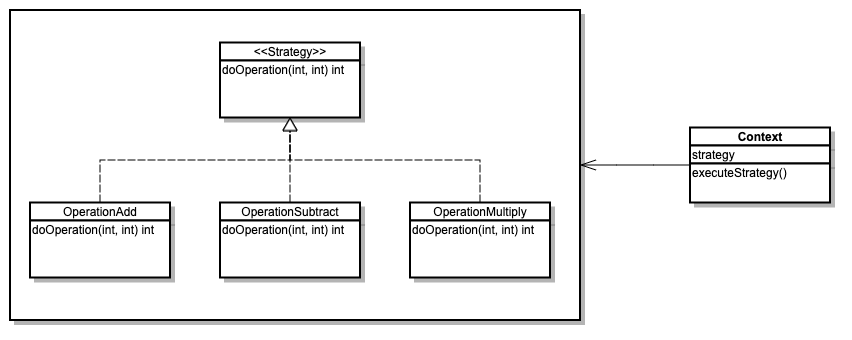
策略模式
UML Diagram
实现
假设我们要实现简单的计算有 加、减、乘三种方法,我们可以使用策略模式来替换不同的算法
package strategy

type Strategy interface {
	doOperation(int, int) int
}

type OperationAdd struct {
}

func (*OperationAdd) doOperation(a, b int) int {
	return a + b
}

type OperationSubtract struct {
}

func (*OperationSubtract) doOperation(a, b int) int {
	return a - b
}

type OperationMultiply struct {
}

func (*OperationMultiply) doOperation(a, b int) int {
	return a * b
}

type Context struct {
	strategy Strategy
}

func NewContext(s Strategy) *Context {
	return &Context{strategy: s}
}

func (c *Context) executeStrategy(a, b int) int {
	return c.strategy.doOperation(a, b)
}
测试代码:
func TestStrategy(t *testing.T) {
	c := NewContext(new(OperationAdd))
	if fmt.Sprintf("10 + 5 = %d", c.executeStrategy(10, 5)) != "10 + 5 = 15" {
		t.Fatal("OperationAdd test fail")
	}

	c = NewContext(new(OperationSubtract))
	if fmt.Sprintf("10 - 5 = %d", c.executeStrategy(10, 5)) != "10 - 5 = 5" {
		t.Fatal("OperationSubtract test fail")
	}

	c = NewContext(new(OperationMultiply))
	if fmt.Sprintf("10 * 5 = %d", c.executeStrategy(10, 5)) != "10 * 5 = 50" {
		t.Fatal("OperationMultiply test fail")
	}
}
命令模式
Command 模式,是一种数据驱动的设计模式,它属于行为型模式。请求以命令的形式包裹在对象中,并传给调用对象。调用对象寻找可以处理该命令的合适的对象,并把该命令传给相应的对象,该对象执行命令。
- 将一组行为抽象为对象, 可以将
invoker和receiver解耦,实现二者之间的松耦合 - 定义三个角色:
invoker: 使用命令对象的入口receiver:真正的命令执行对象Command: 一组抽象的命令对象
使用场景
- GUI 中每一个按钮都是一条命令
- 模拟 CMD
UMl
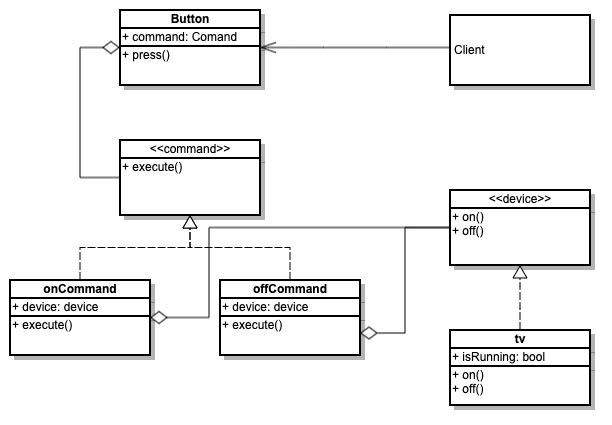
实现
package command

import "fmt"

// Invoker, 调用者

type button struct {
	command command
}

func (b *button) press() {
	b.command.execute()
}

type command interface {
	execute()
}

type onCommand struct {
	device device
}

func (c *onCommand) execute() {
	c.device.on()
}

type offCommand struct {
	device device
}

func (c *offCommand) execute() {
	c.device.off()
}

// Receiver 接收者

type device interface {
	on()
	off()
}

type tv struct {
	isRunning bool
}

func (t *tv) on() {
	t.isRunning = true
	fmt.Println("Turning tv on")
}

func (t *tv) off() {
	t.isRunning = false
	fmt.Println("Turning tv off")
}
测试代码:
package command

import (
	"testing"
)

func TestCommand(t *testing.T) {
	tv := &tv{}
	onCommand := &onCommand{
		device: tv,
	}
	offCommand := &offCommand{
		device: tv,
	}
	onButton := &button{
		command: onCommand,
	}
	onButton.press()
	offButton := &button{
		command: offCommand,
	}
	offButton.press()
}
观察者模式
Observer 模式是一个行为型模式,允许一个 subject 实例发布事件通知给另外多个依赖它的实例(observers)
- 观察者模式使用三个类 Subject、Observer 和 Client。
UML
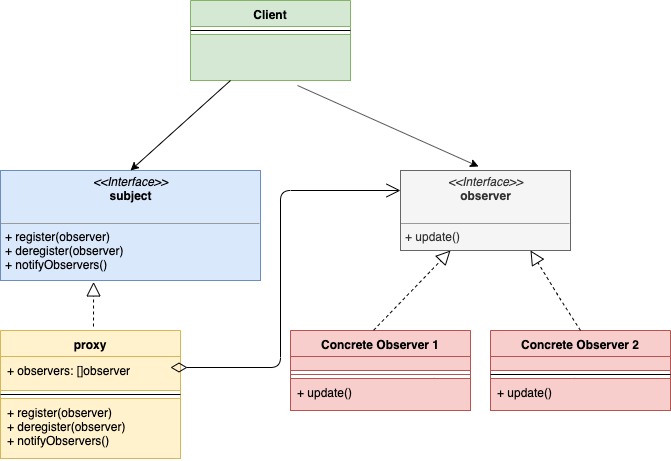
Mapping
| UML actors | implementation actors |
|---|---|
| Subject | subject |
| Concrete Subject | item |
| observer | observer |
| Concrete Observer 1 | customer |
| Client | TestObserver |
实现
package observer

import "fmt"

type subject interface {
	register(Observer observer)
	deregister(Observer observer)
	notifyAll()
}

type item struct {
	observerList []observer
	name         string
	inStock      bool
}

func newItem(name string) *item {
	return &item{
		name: name,
	}
}

func (i *item) updateAvailability() {
	fmt.Printf("Item %s is now in stock\n", i.name)
	i.inStock = true
	i.notifyAll()
}

func (i *item) register(o observer) {
	i.observerList = append(i.observerList, o)
}

func (i *item) deregister(o observer) {
	i.observerList = removeFromslice(i.observerList, o)
}

func (i *item) notifyAll() {
	for _, observer := range i.observerList {
		observer.update(i.name)
	}
}

func removeFromslice(observerList []observer, observerToRemove observer) []observer {
	observerListLength := len(observerList)
	for i, observer := range observerList {
		if observerToRemove.getID() == observer.getID() {
			observerList[observerListLength-1], observerList[i] = observerList[i], observerList[observerListLength-1]
			return observerList[:observerListLength-1]
		}
	}
	return observerList
}

type observer interface {
	update(string)
	getID() string
}

type customer struct {
	id string
}

func (c *customer) update(itemName string) {
	fmt.Printf("Sending email to customer %s for item %s\n", c.id, itemName)
}

func (c *customer) getID() string {
	return c.id
}
测试代码:
package observer

import (
	"testing"
)

// 测试观察者
func TestObserver(t *testing.T) {
	shirtItem := newItem("Nike Shirt")
	observerFirst := &customer{id: "abc@gmail.com"}
	observerSecond := &customer{id: "xyz@gmail.com"}
	shirtItem.register(observerFirst)
	shirtItem.register(observerSecond)
	shirtItem.updateAvailability()
}
状态模式
State 模式,类的行为是基于它的状态改变的。这种类型的设计模式属于行为型模式。
在状态模式中,我们创建表示各种状态的对象和一个行为随着状态对象改变而改变的 context 对象。
UML
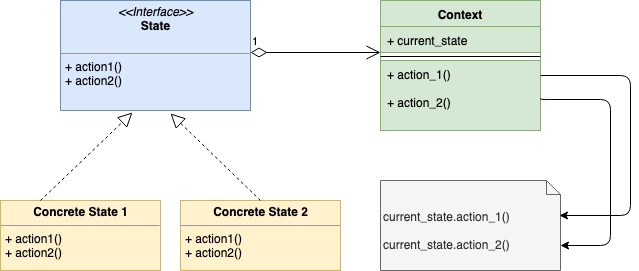
Mapping
| UML actors | implementation actors |
|---|---|
| State Interface | state |
| Concrete State 1 | offLightState |
| Concrete State 2 | weakLightState |
| Concrete State 3 | strongLightState |
| Context | Light |
实现
使用状态模式实现电灯的程序
package state

import (
	"fmt"
)

type Light struct {
	offLight     state // 关灯
	weakLight    state // 弱光
	strongLight  state // 强光
	currentState state
}

func newLight() *Light {
	l := &Light{}
	offLight := &offLightState{
		light: l,
	}
	weakLight := &weakLightState{
		light: l,
	}
	strongLight := &strongLightState{
		light: l,
	}
	l.offLight = offLight
	l.weakLight = weakLight
	l.strongLight = strongLight
	l.setState(offLight)
	return l
}

func (v *Light) setState(s state) {
	v.currentState = s
}

func (v *Light) getState() state {
	return v.currentState
}

func (v *Light) buttonWasPressed() {
	v.currentState.buttonWasPressed()
}

type state interface {
	buttonWasPressed()
}

// 关灯状态
type offLightState struct {
	light *Light
}

func (i *offLightState) buttonWasPressed() {
	fmt.Println("弱光")
	i.light.setState(i.light.weakLight)
}

// 弱光状态
type weakLightState struct {
	light *Light
}

func (i *weakLightState) buttonWasPressed() {
	fmt.Println("强灯")
	i.light.setState(i.light.strongLight)
}

// 强光状态
type strongLightState struct {
	light *Light
}

func (i *strongLightState) buttonWasPressed() {
	fmt.Println("关灯")
	i.light.setState(i.light.offLight)
}
测试代码:
package state

import (
	// "fmt"
	// "log"
	"testing"
)

func TestState(t *testing.T) {
	l := newLight()
	l.buttonWasPressed()
	l.buttonWasPressed()
	l.buttonWasPressed()
	l.buttonWasPressed()
}